- Understanding Preparation for Your Mobile Blood Draw
- Why Preparation Matters More Than You Think
- Step 1: Know Your Fasting Requirements
- Step 2: Hydrate Properly — This Step Changes Everything
- Step 3: Medication Guidelines — What to Take, What to Skip
- Step 4: Prepare Your Home for the Phlebotomist's Visit
- Step 5: What to Wear on Appointment Day
- Step 6: Managing Anxiety and Needle Fear
- What to Expect During Your Mobile Blood Draw
- After Your Blood Draw: Post-Appointment Care
- Frequently Asked Questions About Mobile Blood Draw Preparation
- Your Complete Mobile Blood Draw Preparation Checklist
- Book Your Mobile Blood Draw Today
- Sources & Citations
- Schedule a Visit
Understanding Preparation for Your Mobile Blood Draw
Your doctor just ordered blood work. Instead of driving to a clinic, sitting in a waiting room for an hour, and dealing with traffic, a certified phlebotomist is coming directly to your home.(you have ordered at home mobile blood draw)
But even with the convenience of mobile phlebotomy, proper preparation is still essential, for accurate test results, a smooth appointment, and fast turnaround.
Incorrect or skipped preparation is one of the most common reasons blood tests have to be repeated. This guide eliminates that problem entirely.
In this step-by-step guide, we cover:
- Fasting requirements — which tests need fasting and exactly how long
- Hydration protocols — why water is the single most important thing you can do
- Medication guidelines — what to continue, what to skip, and what to report
- Home preparation — how to set up your space in 5 minutes
- Clothing and comfort — small details that make a real difference
- Managing anxiety — techniques that actually work for needle fear
- What to expect — a minute-by-minute walkthrough of your appointment
- Post-draw care — what to do after the phlebotomist leaves
By the end, you’ll be completely ready for your visit.
Medical Disclaimer: This article is for educational purposes only. Always follow your doctor’s specific preparation instructions for your tests. If you’re unsure about fasting or medications, call your healthcare provider before your appointment.
Why Preparation Matters More Than You Think
Most patients underestimate how much preparation affects their blood test results, and their overall experience.
According to the U.S. National Library of Medicine (MedlinePlus), many blood tests require specific preparation steps to ensure accurate results. Skipping a required fast, forgetting to hydrate, or taking the wrong supplement before certain tests can cause:
- False high or low results leading to misdiagnosis or unnecessary follow-up
- Repeat testing that costs you time and money
- Difficult blood draws because dehydration shrinks your veins
- Unnecessary concern for both you and your doctor
The preparation steps below are simple. They require no special equipment and take minimal time. Our mobile phlebotomy services handle everything on our end, these steps are your contribution to an accurate, comfortable, first-time-success draw.
Also see: Mobile Phlebotomy Cost in 2026 — Complete Pricing Breakdown if you’re still deciding on booking.
Step 1: Know Your Fasting Requirements
Fasting is the most important and most misunderstood part of blood draw preparation.
with your doctor for your specific tests.
Which Tests Require Fasting?
Some blood tests require fasting because recent food intake changes the concentration of certain substances in your blood — especially glucose (blood sugar), cholesterol, and triglycerides.
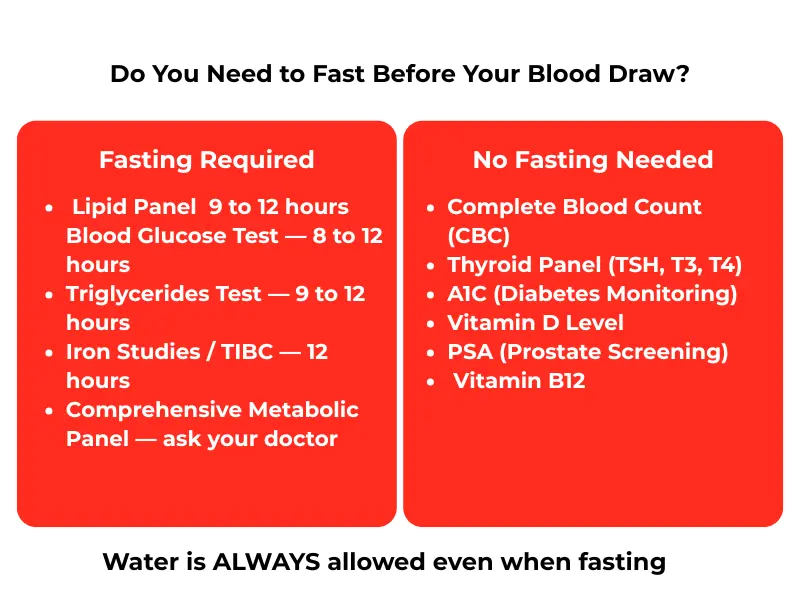
Tests that typically require fasting:
| Blood Test | Fasting Required | How Long |
|---|---|---|
| Lipid Panel (cholesterol) | Yes | 9–12 hours |
| Fasting Blood Glucose | Yes | 8–12 hours |
| Triglycerides | Yes | 9–12 hours |
| Iron Studies / TIBC | Yes | 12 hours |
| Comprehensive Metabolic Panel | Often — check with your doctor | 8–12 hours |
Important: Your doctor’s specific instructions always override this general guide. When in doubt, call ahead.
Tests That Do NOT Require Fasting
Many of the most common blood tests do not require fasting at all:
- Complete Blood Count (CBC) — No fasting needed
- Thyroid Panel (TSH, T3, T4) — No fasting needed
- HbA1c (A1C) — No fasting needed
- Vitamin D — No fasting needed
- PSA (Prostate Screening) — No fasting needed
- Vitamin B12 — No fasting needed
- Most Hormone Tests — No fasting needed (though morning timing is often preferred)
What Can You Have While Fasting?
Even during a required fast, the following are almost always permitted:
- Water — Always allowed and strongly encouraged (see Step 2)
- Plain black coffee — Generally accepted for most fasting tests; check with your doctor
- Your regular prescription medications — Continue unless specifically told to stop
Avoid while fasting:
- Food of any kind
- Juice, milk, soda, or energy drinks
- Alcohol (avoid 24 hours before any draw)
- Chewing gum
Pro Tip: If your order says “fasting” but you’re not sure what that means for your specific test, call our team when booking your routine blood draw — we’ll clarify everything.
Step 2: Hydrate Properly — This Step Changes Everything
make your blood draw faster and more comfortable.
Hydration is one of the most underestimated preparation steps and has a direct, immediate effect on how easy or difficult your draw will be.
When you are well-hydrated, your veins are:
- Larger and more visible beneath the skin
- More elastic and accessible
- Less likely to require multiple attempts
When you are dehydrated, your veins:
- Shrink and become harder to locate
- Are more likely to collapse during the draw
- Increase the likelihood of bruising or multiple sticks
Hydration Protocol Before Your Mobile Blood Draw
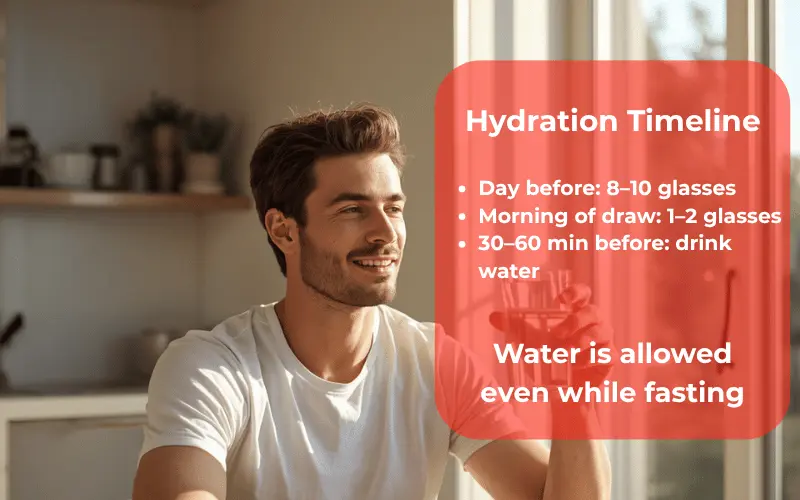
The day before your appointment:
- Drink at least 8–10 glasses of water spread throughout the day
- Avoid alcohol (dehydrates you and can distort certain test results)
- Limit excessive caffeine
Morning of your appointment:
- Drink 1–2 glasses of water (8–16 oz) within 30–60 minutes before your draw
- Even if you’re fasting, water is almost always permitted
- If your test does NOT require fasting, eat a light meal too
One important note: Don’t chug a litre of water right before your appointment. Consistent hydration over 12–24 hours is far more effective than last-minute over-drinking.
Step 3: Medication Guidelines — What to Take, What to Skip
The universal rule first: Never stop a prescribed medication before a blood draw without checking with your doctor. The risks of stopping medication are almost always greater than any effect on test results.
Continue Taking These (Unless Your Doctor Says Otherwise)
- Blood pressure medications
- Heart medications (beta blockers, statins, etc.)
- Diabetes medications — continue, but ask your doctor about insulin timing
- Thyroid replacement medications
- Antidepressants and anxiety medications
- Blood thinners — continue Warfarin, Eliquis, Xarelto, or Aspirin, but tell your phlebotomist before the draw
Talk to Your Doctor About These Before Your Appointment
These supplements and vitamins can sometimes affect specific test results:
- Biotin (Vitamin B7) — High doses (above 5mg daily) can interfere with thyroid and hormone tests. If you take high-dose biotin, ask your doctor if you should pause it 3–5 days before testing.
- High-dose Vitamin C — Can affect some blood markers at very high doses
- Iron supplements — May affect iron study results if taken the morning of the test
- Herbal supplements and teas — Some have active compounds. Mention all of them.
What to Tell Your Phlebotomist When They Arrive
When our phlebotomist arrives for your routine blood draw or any specialty collection, always mention:
- All medications you’re currently taking
- All vitamins and supplements (including herbal)
- If you’re on blood thinners (important for pressure and post-draw care)
- Any recent changes to your medications
- If you have difficult veins or a history of difficult draws
This is not about judgment — it’s about accuracy and safety.
Step 4: Prepare Your Home for the Phlebotomist’s Visit
One of the greatest advantages of mobile phlebotomy is that you control the environment. A well-prepared home space makes the appointment faster, safer, and more comfortable for everyone.
Setting Up Your Space in 5 Minutes
Choose your spot:
- A kitchen table or dining area works best for most patients
- Any chair with armrests — supports your arm comfortably during the draw
- Good lighting — natural or overhead light helps the phlebotomist locate veins clearly
Clear the area:
- 1–2 feet of clear surface space on the nearby table
- Remove clutter and obstacles from around your chair
- Place pets in another room for the duration of the visit
Have these items ready:
- Your photo ID
- Your insurance card (Medicare, Medicaid, or private)
- Your doctor’s lab order or requisition form (if you have a paper copy)
- A glass of water
- A light snack for after the draw (especially important if you fasted)
Optional comfort items:
- A small pillow under your arm for support
- Headphones or your phone if music helps you relax
- A stress ball to squeeze during the draw (raises the vein slightly)
For Patients with Mobility Issues
If you have limited mobility, use a wheelchair, or are primarily bedridden, there is no need to move to a specific location. Our certified phlebotomists are trained and equipped to draw blood from patients:
- In bed
- In a wheelchair or recliner
- At bedside in care facilities
Our mobile phlebotomy services exist precisely for patients who cannot or should not travel. You don’t need to do anything except let us know your situation when you book.
Step 5: What to Wear on Appointment Day
Clothing is rarely mentioned in blood draw guides — but the wrong outfit can add minutes to your appointment and discomfort to your experience.
Best Clothing Choices
- Short sleeves — Gives immediate, comfortable access to your arm
- Loose, stretchy sleeves — Anything that can be rolled above the elbow easily
- Comfortable clothing overall — Helps you relax, which reduces anxiety and helps veins
Clothing to Avoid
- Tight, non-stretchy sleeves — Difficult to roll up and can restrict blood flow
- Compression sleeves or athletic compression garments — Restrict vein access
- Bulky layered outfits — Just keep it simple
For Children: When booking pediatric blood draws, dress your child in their most comfortable outfit with short sleeves or easily rolled sleeves. Familiar, comfortable clothing is a genuine anxiety reducer for children, and it makes our specialist’s job easier.
Step 6: Managing Anxiety and Needle Fear
Up to 25% of adults experience some level of needle fear or anxiety. If that’s you, please know: you are not alone, it is completely valid, and there are real strategies that help.
Before Your Appointment
1. Tell us you’re anxious. This is genuinely the most helpful thing you can do. Inform our phlebotomist when they arrive (or when you book). An experienced phlebotomist will slow down, talk you through each step, give you full control of pacing, and use the gentlest technique possible.
2. Consider a topical numbing cream. Over-the-counter topical anesthetic creams are available at most pharmacies. Applied 45–60 minutes before your draw to the inner elbow, they significantly reduce the sensation of the needle. Ask your pharmacist for a recommendation.
3. Practice the 4-7-8 breathing technique before the draw:
- Breathe IN slowly through your nose for 4 counts
- HOLD your breath for 7 counts
- Breathe OUT completely through your mouth for 8 counts
- Repeat 3–4 times
This activates your parasympathetic nervous system and measurably reduces anxiety.
During the Draw
4. Look away. You do not have to watch. Fix your gaze on a point across the room and keep it there. Many patients find this removes most of the psychological difficulty.
5. Use distraction. Put in headphones and listen to a podcast, music, or even a phone call. Genuine mental distraction is more effective than willpower.
6. Request to lie down. If you have a history of fainting (vasovagal response) during or after blood draws, tell our phlebotomist before they begin. Drawing blood while you’re lying on a couch or bed is completely standard and dramatically reduces fainting risk.
7. Squeeze a stress ball. Gently squeezing a stress ball or your fist right before insertion helps raise the vein slightly and gives your nervous energy a productive outlet.
For anxious children: Our pediatric blood draw specialists are specifically trained in child-calming techniques, distraction methods, and child-friendly language. Bring a favorite stuffed animal. Let the child choose where to sit. Let them know they’re in charge. We do the rest.
What to Expect During Your Mobile Blood Draw

takes just 15–30 minutes total.
Knowing exactly what will happen is one of the most powerful anxiety-reduction tools available. Here is a step-by-step walkthrough of a typical appointment.
Full Appointment Timeline: 15–30 Minutes Total
Arrival and Verification (5 minutes)
- Your certified phlebotomist arrives at your door at the scheduled time
- They verify your identity with your ID
- They review your lab order to confirm which tests are ordered
- They confirm your fasting status (if applicable) and ask brief medical history questions
- You can ask any questions you have at this point
Setup and Preparation (5–10 minutes)
- The phlebotomist unpacks sterile, single-use equipment at your chosen surface
- All supplies are new, sealed, and opened in front of you
- You’re seated in your chosen spot with your arm resting comfortably
- The phlebotomist examines both arms to identify the best vein (usually the antecubital vein inside your elbow)
- A tourniquet is applied briefly to your upper arm to raise the vein
- The draw site is cleaned with an antiseptic wipe and allowed to dry
The Blood Draw (2–5 minutes)
- A small, sterile needle is inserted — this is typically a brief 2–3 second sting
- One or more collection tubes are filled (each tube takes 5–30 seconds)
- You may feel mild pressure — this is normal
- If multiple tests are ordered, several tubes may be filled with the same needle
- The needle is smoothly removed and pressure is immediately applied to the site
- A clean bandage is placed over the draw point
Wrap-Up (5–10 minutes)
- All used needles and biohazard materials are sealed and removed by the phlebotomist — nothing is left in your home
- Samples are labeled, documented, and packaged for secure transport to the laboratory
- Post-draw care instructions are reviewed with you
- The phlebotomist leaves with your samples
Need results faster? Our STAT draw service is available for urgent same-day processing. Let us know when booking.
After Your Blood Draw: Post-Appointment Care
Your preparation doesn’t end the moment the phlebotomist walks out the door.
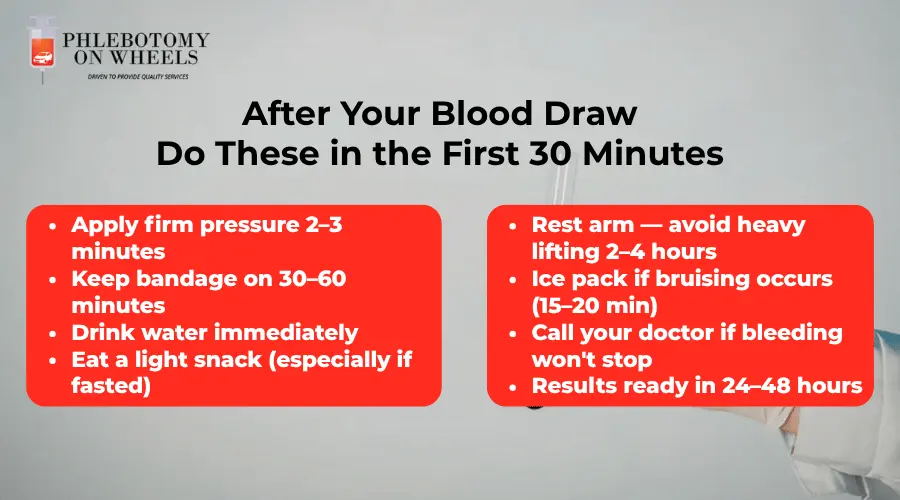
The First 30 Minutes After Your Draw
Apply firm pressure immediately. Hold a clean gauze pad or the provided bandage firmly on the draw site for at least 2–3 minutes. Keep your arm straight — do not bend it at the elbow right away, as this increases bruising risk.
Keep the bandage on. Leave the bandage in place for a minimum of 30–60 minutes. If you notice bleeding soaking through, add a second piece of gauze and apply firmer pressure for another 5 minutes.
Eat and drink. If you were fasting, now is the time to break it. Have your prepared snack or meal. Drink water. Your blood sugar needs to recover, especially if the fast was 12 hours.
Rest your arm. Avoid heavy lifting, strenuous exercise, or carrying groceries with the draw arm for at least 2–4 hours. Light activity is fine.
Ice for bruising (optional). If you develop a bruise, applying a cold pack (wrapped in cloth) for 15–20 minutes within the first hour can reduce its size. Bruising is common and resolves on its own within 3–10 days.
Normal Reactions vs When to Contact a Healthcare Provider
These are normal and expected after a blood draw:
- Minor bruising at the draw site (resolves in 3–10 days)
- Slight tenderness or soreness for 1–2 days
- A small lump or firmness under the skin (minor hematoma — resolves on its own)
- Feeling briefly lightheaded immediately after — sit down, breathe, eat something
Contact your healthcare provider if you experience:
- Bleeding that will not stop with 10 minutes of firm, continuous pressure
- Increasing pain, significant swelling, or warmth spreading from the draw site
- Numbness or tingling in the hand, fingers, or arm
- Signs of infection: fever, spreading redness, discharge from the site
When to Expect Your Results
Most routine blood test results are ready within 24–48 hours. Your healthcare provider will share results through their patient portal, by phone, or via their preferred communication method.
For specialty tests, allow 3–7 business days. Results for specialty collections and therapeutic phlebotomy may vary, we’ll let you know the expected timeline when you book.
Frequently Asked Questions About Mobile Blood Draw Preparation
A: For most tests, plain black coffee with no milk or sugar is generally accepted. However, if you are fasting for a lipid panel, triglyceride test, or glucose test, the safest approach is water only. When in doubt, ask your doctor or inform our phlebotomist when booking.
A: Tell our phlebotomist as soon as they arrive — before the draw begins. For tests that require fasting (lipid panel, glucose tests), we will need to reschedule your appointment for a day when you’ve properly fasted. It is far better to reschedule than to get inaccurate results that lead to unnecessary follow-up. For tests that do not require fasting, eating beforehand is not an issue at all.
A: Yes. Our pediatric blood draw services cover everything from infant heel sticks for newborns to standard venipuncture for children and teenagers. Our pediatric-trained specialists use gentle techniques and child-friendly communication. For infants, the preparation steps are simpler and we’ll guide you when you book.
A: Yes. This is one of the most common situations our phlebotomists handle. Proper hydration (see Step 2) helps significantly. When booking, let us know about your history, we will assign our most experienced technician and use the most appropriate needle gauge and technique for your situation.
A: We recommend avoiding strenuous exercise for 24 hours before your draw. Heavy exercise affects certain enzyme levels in your blood (such as creatine kinase and LDH) and can temporarily affect other markers. Light activity like walking is fine.
A: Yes! Each one has its own protocol. When you book any of our specialty services, we provide detailed, specific preparation instructions:
- Urine Sample Collection — midstream clean-catch protocol
- Saliva Kit Collection — timing and fasting requirements
- Stool Specimen Collection — dietary restrictions beforehand
- Paternity Testing Kit Collection — no fasting, standard procedure
Your Complete Mobile Blood Draw Preparation Checklist
Print this out or screenshot it before every appointment.
24 Hours Before:
- Confirm whether your specific test requires fasting
- Drink 8–10 glasses of water throughout the day
- Avoid alcohol completely
- Avoid strenuous exercise
- Choose and prepare your home draw space (comfortable chair, clear surface, good lighting)
- Lay out your ID, insurance card, and lab order
Morning of Your Appointment:
- Drink 1–2 glasses of water within 30–60 minutes of your appointment
- Take your regular medications (unless doctor said to skip)
- Wear short sleeves or loose, easy-to-roll sleeves
- Prepare a light snack to eat after your draw
- Put pets in another room
- Have your ID and insurance card accessible
When Your Phlebotomist Arrives:
- Inform them of ALL medications and supplements you take
- Tell them if you’re anxious or prone to fainting
- Confirm your fasting status
- Ask any questions before the draw begins
- Take a deep breath — you’ve prepared well
Book Your Mobile Blood Draw Today
You’re fully prepared. The next step is scheduling.
Our certified phlebotomists come directly to your home, office, nursing facility, or care center — with everything needed for a professional, first-time-success blood draw.
Schedule Your At-Home Blood Draw Today →
Our services available for your appointment:
- Routine Blood Draws — Standard, scheduled visits
- STAT Draws — Urgent, same-day results
- Pediatric Blood Draws — For infants, children, and teens
- Standing Orders — Regular scheduled monitoring
- Therapeutic Phlebotomy — Medically directed treatment
- Specialty Testing Collections — DNA, paternity, hormones, and more
Sources & Citations
- MedlinePlus — U.S. National Library of Medicine
- Medicare.gov — Medicare Costs & Coverage 2026
- Healthcare.gov — Health Insurance Coverage
- Medicaid.gov — Medicaid State Coverage
For the most current coverage and eligibility information, visit the official sources above or speak directly with your insurance provider.
This article is for educational purposes only. The information provided does not constitute medical advice. Always consult your healthcare provider for preparation instructions specific to your tests and medical history.
GET IN TOUCH
One Response