
Pediatric Blood Draw at Home — A Parent’s Complete Guide

The Waiting Room Nobody Talks About
You know that moment, the one every parent dreads before a pediatric blood draw.
Your child sees the needle tray and everything changes. The crying starts before anyone even touches them. Other patients stare. You try to stay calm while holding down a 6-year-old who is convinced something terrible is about to happen.
You leave the clinic exhausted. Your child leaves traumatized. And somewhere in the car ride home you think — there has to be a better way.
There is.
A pediatric blood draw at home changes everything about that experience. Not because the draw itself is different. But because the setting is. Your child is on their couch. Their toys are right there. You are beside them the entire time. The phlebotomist comes to you, not the other way around.
According to Nemours KidsHealth, a calm child is easier and safer to draw from. Familiarity creates calm. Home is the most familiar place your child knows.
That single shift changes the whole appointment.
Why Kids Struggle With Lab Visits
Think about what a clinic looks like through a child’s eyes.
Strangers everywhere. A sharp antiseptic smell. People in scrubs walking in and out. A waiting room with hard chairs. Then a small room. A table with paper on it. A tray of things that look frightening.
By the time the phlebotomist walks in, the anxiety has been building for 45 minutes. The child is primed to panic. And a panicked child, arms stiff, muscles tensed, fists clenched, is genuinely harder to draw blood from. Veins are harder to find. The draw takes longer. Everyone gets more stressed.
This is not your child being difficult. This is a perfectly reasonable response to an unfamiliar clinical environment.
Remove the unfamiliar environment. Keep everything else the same. The draw becomes a completely different experience.
What Makes a Pediatric Blood Draw Different
A pediatric blood draw is not the same as drawing blood from an adult. Children have smaller veins. They move more. They respond differently to anxiety. A phlebotomist working with children needs specific training, both technical and emotional.
Venipuncture
A needle inserted into a vein, typically in the inner elbow or back of the hand. Used for older children and teens when larger blood volumes are needed.
Finger Stick
A small lancet pricks the fingertip to collect a few drops of blood. Used for many routine childhood tests. Quick and straightforward for most school-age children.
Heel Stick
Used for infants and newborns. The heel is warmed, then a lancet pricks the side of the heel to collect blood. This is the standard method for newborn screening tests and early infant monitoring.
The right method depends on your child’s age, the tests ordered, and the blood volume required. A certified pediatric phlebotomist decides this before the appointment begins, not while your child is already anxious and waiting.
See our dedicated pediatric blood draws and heel sticks service page for the full list of tests we can collect for children of all ages.
How a Pediatric Blood Draw at Home Actually Works
The process is designed around one goal: get in, get the sample, and leave your child feeling okay about it.
Step 1 — Booking the Appointment
Choose a time when your child is well-rested and fed. Morning appointments after a light breakfast usually work best, unless fasting is required for the specific tests ordered.
Step 2 — The Phlebotomist Arrives
Our certified phlebotomist arrives at your home with all equipment. Sterile supplies, appropriate needles and lancets, collection tubes, labeling materials, everything needed. You provide the space. We bring the rest.
Step 3 — Introduction Before Equipment
Before anything comes out of the bag, the phlebotomist introduces themselves to your child directly. This takes two minutes. It matters enormously. A child who has looked at the person’s face and heard their voice is far less frightened than a child who sees equipment before they see a human being.
Step 4 — The Draw
You stay with your child the entire time. Hold their hand. Talk to them. The draw itself takes 5-10 minutes. Your presence is not just allowed, it is encouraged. You are the single biggest calming factor in the room.
Step 5 — Sample Preparation and Departure
Samples are labeled, packaged, and prepared for the laboratory immediately. Results go directly to your child’s doctor through the same accredited lab network used by hospitals and clinics everywhere.
For a full overview of how mobile blood draws work for patients of all ages, see our complete service guide.
What to Tell Your Child Before the Appointment
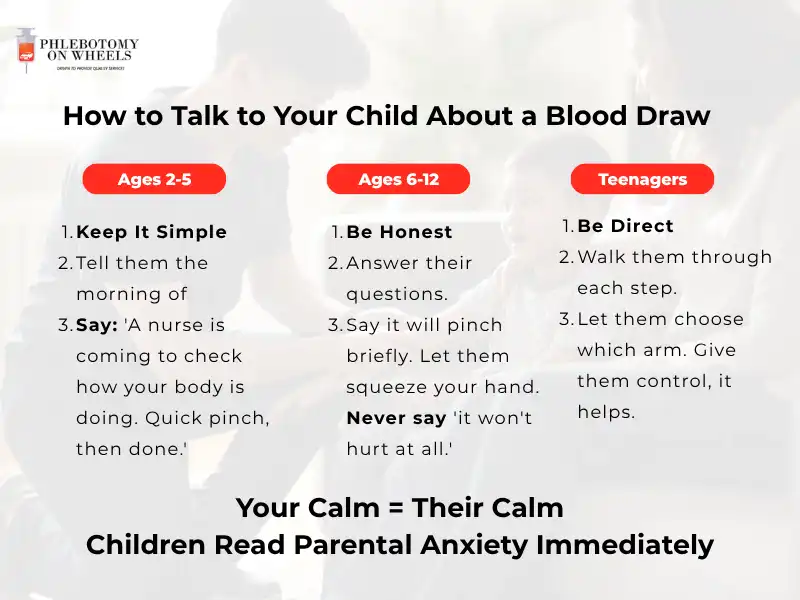
Here is the mistake most parents make, they either say nothing at all, or they over-explain for three days straight and accidentally turn a 10-minute appointment into a week of dread.
The right approach depends entirely on how old your child is.
Toddlers and Preschoolers — Ages 2 to 5
Tell them the morning of. Not three days before. Not the night before. The morning of.
Keep it short and concrete:
“A special nurse is coming to our house today to check how your body is doing. It will feel like a tiny pinch, and then we are getting [their favorite snack] after.”
That is it. No lengthy explanations. No “but don’t worry it won’t hurt.” Just honest, simple, and followed immediately by something they can look forward to. Toddlers live in the present, give them a present-moment reward to focus on.
School-Age Children — Ages 6 to 12
These children will ask questions. Answer them honestly.
Yes, it will pinch a little. Yes, it is very fast. Yes, you will be right there holding their hand. No, you will not leave the room.
The worst thing you can say is “it won’t hurt at all” — because the moment it does pinch, you have broken their trust. Every future blood draw becomes harder after that. Honest and calm beats reassuring and false every single time.
Give them a job. Ask them to count to 10 out loud during the draw. Give their brain something to do and their body follows.
Teenagers
Give them control wherever you can.
Which arm? Their choice. Watch or look away? Their choice. Music playing? Their choice. Teenagers resist when they feel powerless. Give them something to own in the process and the resistance drops significantly. Most teens who walk in defensive walk out surprised at how fast it was.
What helps across all ages:
- Bring a comfort item — a toy, stuffed animal, or favorite blanket
- Have a screen ready — a short video during the draw works as a powerful distraction
- Praise them after, not during — wait until it is over to tell them how brave they were
- Stay calm yourself — your child is reading your face and body language constantly
For more preparation tips that cover all ages, see our complete blood draw preparation guide.
Heel Sticks for Infants — What Parents Need to Know
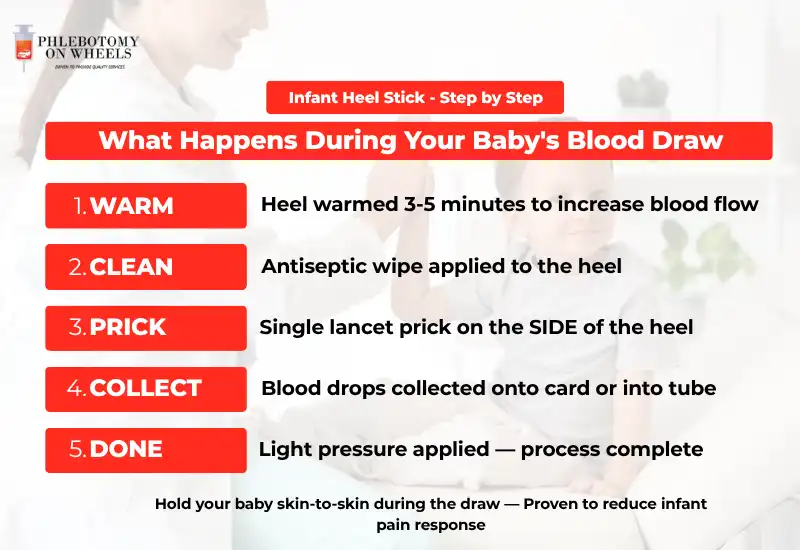
Your baby cannot understand what is happening. They cannot be prepared with words. What they can feel completely and powerfully, is you.
Research published in Pediatrics (PubMed/NIH) found that skin-to-skin contact during a heel stick reduced crying by 82% and grimacing by 65% compared to infants not held during the procedure. Not 10%. Not 20%. Eighty-two percent.
Your heartbeat. Your warmth. Your smell. These are the most powerful pain relief available to a newborn, free, always available, and requiring nothing except you holding your baby against your chest.
If there is one thing you take from this entire guide, make it this: hold your baby skin-to-skin during the heel stick. Everything else is secondary.
What Happens During a Heel Stick
- The heel is warmed with a warm cloth or heel warmer for 3-5 minutes to increase blood flow
- The heel is cleaned with an antiseptic wipe
- A single lancet prick on the side of the heel, never the center
- Blood drops are gently collected onto the collection card or into a tube
- Light pressure is applied until the bleeding stops
The entire process takes under 10 minutes. Most parents are surprised at how quickly it is over.
What Reduces Pain During the Draw
Skin-to-skin contact is the most effective non-medication pain relief available. Beyond that:
- Breastfeeding during the draw — the combination of skin contact, sucking, and sweetness provides multiple layers of calming signals
- A pacifier dipped in sugar water — shown to significantly reduce distress responses in infants
- Your voice — speaking softly and consistently throughout gives your baby an anchor point in the experience
- Staying still yourself — your baby feels your tension in your muscles. The calmer you are, the calmer they are.
How to Prepare Your Home for a Pediatric Blood Draw

You do not need to do much. The phlebotomist brings everything. A few small steps make the appointment run more smoothly.
Choosing the Right Spot
A couch, armchair, or bed works best. Your child should be comfortable and slightly reclined — not sitting upright in a hard chair. Good natural lighting helps the phlebotomist find the vein quickly. Do not overthink this. The living room couch is perfect.
What to Have Ready
Doctor’s lab order — printed or on your phone. The phlebotomist needs to confirm the tests before starting.
A snack for after — unless fasting is required, having a favorite snack ready gives your child something to look forward to during the draw. Name it before starting: “As soon as this is done, the cookies are waiting.”
A cleared surface nearby — a coffee table or side table for supplies. Just a few square feet of clear space.
A distraction screen — a tablet with a favorite show or video queued up and ready.
Tell the Phlebotomist in Advance
If your child has had a difficult draw before, rolling veins, extreme anxiety, or prior fainting, tell the phlebotomist before they start. This changes the entire approach from the beginning rather than after a problem occurs.
What Makes Our Pediatric Blood Draw Service Different
Not every phlebotomist is equally comfortable with pediatric patients. Working with children requires a specific skill set that most general phlebotomists simply do not practice every day.
Technical Skills Our Team Brings
Butterfly needle technique — a smaller, shorter needle specifically suited to children’s smaller veins. Less intimidating. Less painful. Faster.
Heel warming protocol — the correct warming time and pressure applied before an infant heel stick makes a real difference to blood flow and collection speed.
Vein assessment before approach — a good pediatric phlebotomist looks before they touch. They assess vein quality visually and by gentle palpation before any needle is introduced. This reduces failed attempts.
Knowing when to stop — if a child is in genuine distress and the draw is not going well, the right call is to pause, reset, and try again rather than push through and create a lasting negative memory.
Communication Skills That Change the Experience
Age-matched language — the way you speak to a 4-year-old is different from a 9-year-old or a 15-year-old. Our phlebotomists adjust automatically.
Narrating each step — telling your child what is happening next — “now I am just going to clean your arm, this will feel cold”, removes the element of surprise that causes most anxiety spikes.
Redirecting attention — asking your child a question they actually have to think about — “what is your dog’s name?”, at the moment of the draw is a genuinely effective distraction that costs nothing.
This level of patient focus is not always possible in a clinic where a phlebotomist has 40 patients booked. See our comparison of mobile phlebotomy vs traditional lab visits for a full breakdown of the difference.
Frequently Asked Questions
We perform pediatric blood draws for children of all ages, including newborns from day one. Heel sticks for infants, finger sticks and venipuncture for older children depending on the tests required and blood volume needed.
It depends on the tests ordered. Many routine childhood blood tests do not require fasting. Tests like fasting glucose or a lipid panel do. Your child’s doctor will specify on the lab order. When in doubt, call before the appointment.
Yes, and we strongly encourage it. Your presence is the single biggest calming factor for a child during a blood draw. Hold their hand, stay at eye level with them, and keep your voice calm and steady.
Tell us when you book. We adjust our entire approach, more time for introductions, smallest appropriate needle, full distraction protocol throughout. Most needle-phobic children are settled within minutes once the draw begins. The home setting alone removes most of the anticipatory anxiety that clinic visits create.
The draw itself takes 5-10 minutes. The full appointment including arrival, setup, draw, and sample preparation is typically 15-20 minutes total.
The lab tests ordered by your child’s doctor are typically covered by insurance. The mobile service fee varies by provider and plan. See our mobile phlebotomy cost guide for a full breakdown by insurance type including Medicare and Medicaid.
Yes. The same accredited laboratories process all samples regardless of where collection happens. Accuracy is determined by the lab, not the collection location. Our mobile vs traditional lab comparison explains this in full.
Ready to Book a Pediatric Blood Draw at Home?
You have already done the hard part, finding a better way.
Most parents spend years dreading clinic visits for their child’s blood work. The waiting. The anxiety. The aftermath. All of it building up around something that should take 10 minutes.
It does not have to be that way.
Our certified phlebotomists come to your home, work at your child’s pace, and leave with the samples your doctor needs. No waiting rooms. No strangers. No fluorescent lights and antiseptic smell. Just your home, your child comfortable on their own couch, and a professional who has done this hundreds of times with children exactly like yours.
Book a Pediatric Blood Draw at Home →
Same accredited labs. Same certified professionals. Just a better experience for your child.
Related services you may need:
- Pediatric Blood Draws & Heel Sticks — our dedicated pediatric service page
- Mobile Phlebotomy Services — all ages, all tests
- How to Prepare for a Blood Draw — full preparation guide for all ages
Sources & Citations
- Nemours KidsHealth — Getting a Blood Test (Medically Reviewed March 2026)
- Gray L, et al. Skin-to-skin contact is analgesic in healthy newborns. Pediatrics. 2000 Jan;105(1):e14. National Library of Medicine PMID: 10617751
This article is for educational purposes only and does not constitute medical advice. Always consult your child’s doctor before any lab testing.
Walk in Available